CVS Tutorial
CVS is a simple but well-known system for keeping track of source code revisions. This article briefly overviews the essentials of CVS, as well as using CVS on Linux and on Windows (through TortoiseCVS). It has since been upgraded by many other more powerful systems, but it remains widely used due to its simplicity.
Essentials
Introduction
The best analogy for CVS's model is a library. The library maintains the "master" copies of all the source code. To obtain the source code, you "check out" a copy. You can then make revisions to your copy. When you're ready to return your changes to the master copy, it is called a "commit."
CVS source code repositories are separated into "modules," which are simply sub-folders of the repository. Each module can have folders or files (both text and binary).
Access to CVS repositories are generally based on two methods: SSH or pserver. SSH based access is based on UNIX SSH accounts, and is considered superior for using SSL (and thus being secure). Pserver access is unecrypted, but allows for non-UNIX account access. It is often used for anonymous CVS reading.
Basic Commands
These are the four essential CVS operations:
- co (or checkout) - Retrieves the current copy of the source tree.
- update - Updates your local copy to sync any changes from the master.
- add - Adds a file to the local source tree.
- commit - Commits any local changes to the master (including adds).
Checkouts
Normally, you only need to checkout code once. After this, you can simply update your code to acquire any changes. A clean checkout often helps remove stale files.
Updates
In practice, you should always update your local source copy before editing. This is to prevent merge problems, where two developers edit the same file and try to commit it at the same time.
Some people prefer to keep two copies of the source locally. The first copy is used only for committing changes and updating, and the second copy is only used for editing. This essentially keeps a local master and a local volatile copy.
Adds/Removals
CVS file adds are also complemented by removals (the command is "remove"). Both are considered changes to the source tree, and thus, they do not take effect until committed.
Commits
CVS commits are usually atomic and transactional. That means if you commit a set of changes while your copy is older than the master, or otherwise unsynced, that file cannot be committed (and you may have to manually merge changes in). Furthermore, when committing a set of files, if one fails, the entire commit should fail.
When commits do fail, it is important to review why. Otherwise, you could risk reverting changes from another author.
TortoiseCVS
Introduction
TortoiseCVS is a Windows Explorer/Shell CVS integration tool. Most users like it for its inherent simplicity and the quick ability to checkout source from within any Windows folder.
TortoiseCVS can be downloaded from: [1]
Once installed, you should either kill and restart all explorer.exe instances, or simply reboot. Once installed, read below.
Basic Usage
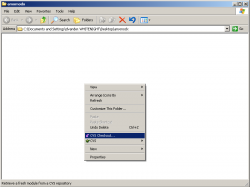
To start, create an empty folder anywhere on your computer. Open it, and right click somewhere inside. You should see a "CVS Checkout" option similar to below. Click it.
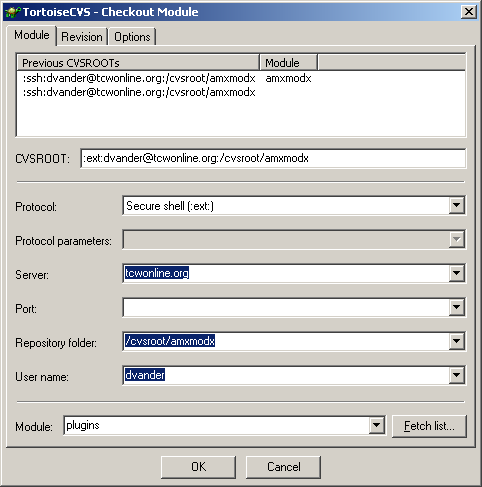
The dialog box will say "Checkout Module." This is where you enter the information about the CVS server.
- Protocol: - This is where you select the CVS server protocol.
- Server: - The server hostname/ip address.
- Repository folder: - The server's path to the CVS repository. You must know this in advance.
- User name: - The username to authenticate as.
- Module: - The module in the repository that you wish to checkout.
For example, CVS connections to cvs.tcwonline.org generally look like:
Once all the files are downloaded, you will see them in the folder. You can then perform general CVS operations, such as committing, by right clicking in the empty spaces.
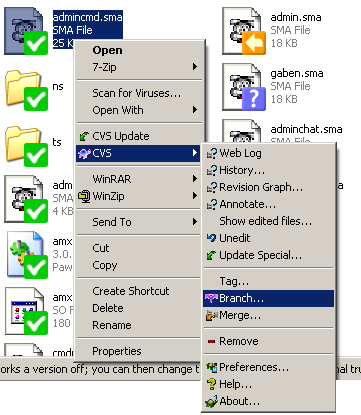
To operate on a specific file, you can simply right click on the file. TortoiseCVS color codes files based on their status. Green means "unmodified locally," orange means "modified locally," blue means "not part of the source tree," and red means "merge failure."
To commit changes, simply right click and go to "Commit." You can either commit all changes to the local scope or one single file. When you commit, you are allowed to attach a text comment to your revision. This is a good way to let people watching or reading CVS to see an overview of your changes.
Adding/Removing Files
Right click on the new file, then go to "Add." You will need to commit.
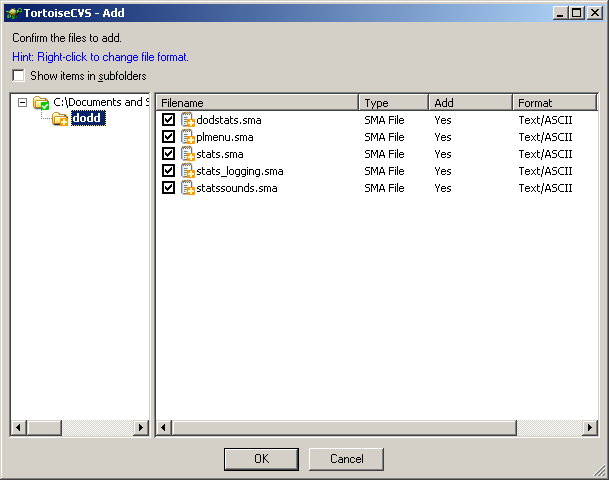
To add a folder and all its files, right click on the folder and click "CVS Add Contents." You will get a dialog box similar to below. It is important to uncheck files that might accidentally get merged in - such as password text files, binaries, et cetera.
Likewise, to remove a file, simply right click it and use "CVS Remove." You cannot remove folders.
Creating a New Module
To create a new module, open a blank folder, or a folder already containing your source code. Right click to get the TortoiseCVS menu and select "CVS," then "Make New Module."
The menu will look exactly the same as the Checkout menu, except the module name must be one that does not yet exist. Once created, you can attach an initial comment and files. This is called the "Initial Import."
Linux/Command Line CVS
Introduction
Command line CVS requires the CVS binary to be installed and ideally accessible from your PATH environment variable. Some servers default to using the RSH protocol for CVS, which is deprecated. Before proceeding, you should type this line, or add it to your shell's startup script (for example, ~/.bashrc):
export CVS_RSH="ssh"
When using CVS commands outside of a directory that contains a CVSROOT, you must explicitly set the CVSROOT either through the environment variable (CVSROOT), or through the -d parameter of the cvs tool. The format for this parameter is:
- :protocol:username@host:cvsroot
For example, the TortoiseCVS sample entries for tcwonline.org would look like:
-d:ext:[email protected]:/cvsroot/amxmodx
Note that "ext" is often required instead of :ssh:, and will default through the CVS_RSH environment variable.
Basic Usage
The checkout example from TortoiseCVS would look like:
cvs -d:ext:[email protected]:/cvsroot/amxmodx co plugins
This will create a new directory called "plugins" which will contain all the downloaded files from the master.
To then update this copy, you simply need to type "cvs update" while inside the directory.
Similarly, "cvs commit" will attempt to commit the files in the current directory. It will bring up an editor (defined in the EDITOR environment variable) so you can type your comment -- simply save and exit the editor once done.
You can "cvs add <file>" as well, however, "cvs remove" is different. You must remove the file first. For example:
rm gaben.sma
cvs remove gaben.sma
Creating Repositories/Modules
If your CVS is local, you can create a new repository like this:
mkdir /cvsroot/mycvs
cvs -d /cvsroot/mycvs init
To create a new module, create an empty directory and chdir to it. Then use cvs import as shown. Note that if you use this inside a folder with files, the files will be added as the initial import. This is a good idea if you already have the source code structure in place.
mkdir mycvs
cd mycvs
cvs import -m "Initial import" mymodule mycvs start
The "mycvs" and "start" are respectively the "vendorname" and "releasename." You can generally put anything you want.


